Android Studio版 ChatGPTと話そう!(その1)
OpenAIのGPT-4を使って新しいAndroidアプリをAndroid Studio FlamingoとKotlinを使って作ります。Android StudioはWindowsでもMac, Linux, ChromeOSでも動きますので手元のパソコンが使えます。
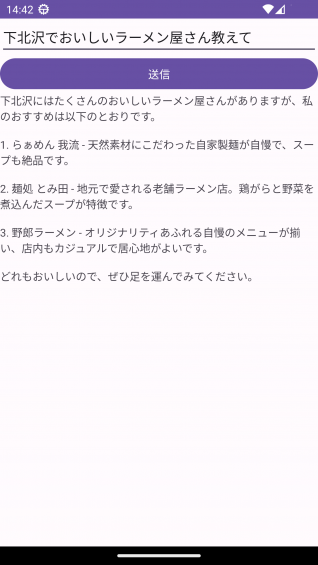
ここで作るのはChatGPTと話そう!(その1)としてChatGPTに入力したプロンプトを送って返答を画面に表示するアプリです。いろいろ試してみましたが、GPT-4はAndroidアプリはうまく作れなかったので、もしやと思い、英語でプロンプトを入れたら動くコードをくれました。日本語のKotlinのコードはあまり入っていないようですね。
GPT-4とのやり取り
プロンプト
Please tell me how to create an android app with the following features with Android Studio and kotlin according to step 1 to step 3. Please be detailed so that even a beginner can understand.
Features:
1. send the entered text to ChatGPT. The model is gpt-3.5-turbo
2. display the returned reply on the screenStep 1: Explanation of detailed functions
Step 2: Outline of how to make it
Step 3: Explain in detail so that even a newcomer can understand. the communication part with ChatGPT should
返答
This is a simple guide to create an Android application in Kotlin using Android Studio that can communicate with the ChatGPT-3.5-turbo API.
This guide assumes you have Android Studio installed on your machine and basic knowledge of Kotlin. If you need to install Android Studio, please refer to the official Android Studio website.
Here are the steps you need to follow to create the Android Application:
Step 1: Explanation of Detailed Functions
- User Input: We need to create an interface where users can input text. For this, we will use an EditText view.
- Send Request: When users have entered the text, we need to send it to the OpenAI server via a POST request. This can be done using a library like Retrofit or OkHttp.
- Receive Response: Once we have sent the request, we will receive a response from the server. This response needs to be handled and displayed to the user.
- Display Response: We will display the response in a TextView.
Step 2: Outline of How to Make It
- Create a New Project in Android Studio: Start a new Android Studio project with an Empty Activity.
- Layout Design: Design the layout of your application using the XML file in the 'res/layout’ directory. You should have an EditText for input and a Button to send the request, and a TextView to display the response.
- Networking: Add Retrofit or OkHttp to your project to handle HTTP requests.
- API Key: Register on the OpenAI website and get an API Key. This key will be used to authorize your requests to the OpenAI server.
- Request and Response: Create a function to handle the request and response. This function will take the text from the EditText, send it as a request to the OpenAI server, receive the response, and display it in the TextView.
Step 3: Detailed Explanation for Beginners
- Project Setup: Open Android Studio, click on “New Project", select “Empty Activity", and click “Next". Give your application a name, select “Kotlin" as the language, and finish.
- Layout Design: Open the 'activity_main.xml’ file from the 'res/layout’ directory. Remove any existing code and paste the following:
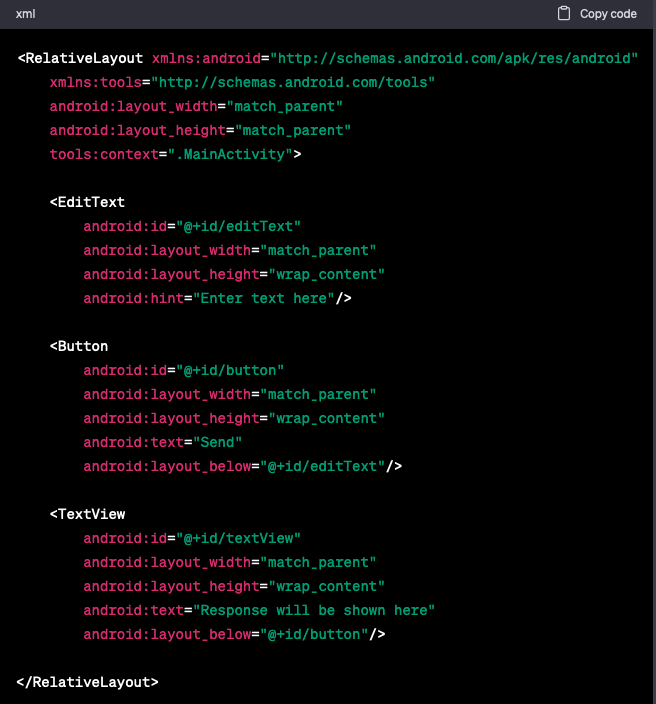
This will create an EditText for input, a Button for sending the request, and a TextView to display the response.
- Adding Dependencies: Now we need to add Retrofit and Gson dependencies to our project. Open your 'build.gradle’ (Module) file and add these lines inside dependencies:
implementation 'com.squareup.retrofit2:retrofit:2.9.0'
implementation 'com.squareup.retrofit2:converter-gson:2.9.0'
Click “Sync Now" at the top right corner of the screen to download and integrate these libraries into your project.
- API Key: Go to the OpenAI website, create an account, and get your API Key. We will use this key to authorize our requests.
- Setting up Retrofit: Now, we will setup Retrofit to handle HTTP requests.
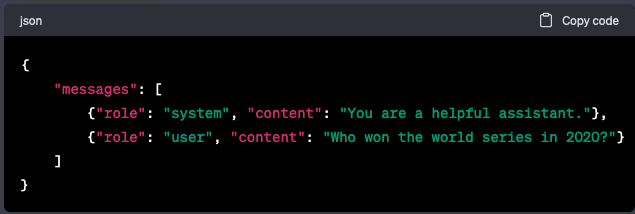
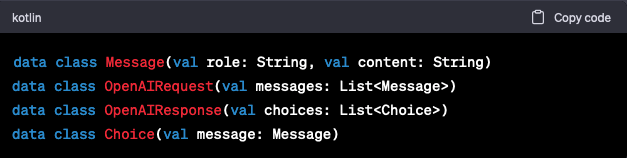
Creating a Data Class: First, we need to create a data class that represents the request payload and the response payload. The request payload for GPT-3.5-turbo is a JSON that looks like this:
So, our data classes will look like this:
延々と説明が続きます。